
How to iterate over a large set of data with Ikomia STUDIO

Let us introduce you to the Batch Processing mode of Ikomia STUDIO. This tutorial is the logical continuation of the Step by step user guide for Ikomia STUDIO. Therefore, we assume that you are familiar with the key features of the workflow before reading these lines.

With Ikomia STUDIO, you can easily build custom image processing pipelines in a no-code manner. While developing new workflows to address a specific application, we often use a few images or videos.
However, during the validation phase, a larger dataset is required to ensure reliability and accuracy. This is where the Batch Processing mode comes into play. It extends the STUDIO and provides the ability to iterate over a large set of data.
The first step is to set global inputs for your workflow. As you may already know, the data should already be loaded as a project in Ikomia. The software allows you to load multiple images, videos, or entire filesystem folders. The data is then structured into a dataset and added to a project.
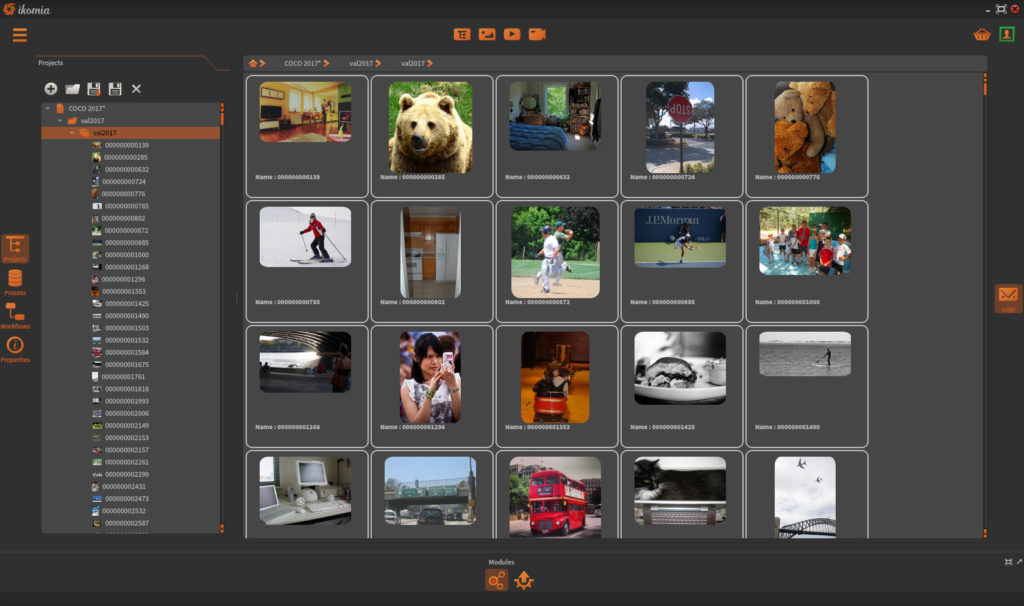
For example, when opening a filesystem folder containing images, this is what a project looks like:
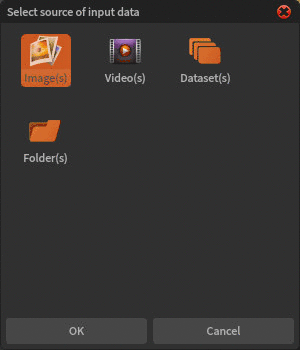
Once the data is loaded, we create a new workflow and add algorithms to it. After that, we add a new global input to set the list of images (or videos) we want to process. Different choices are available within the project structure. Simply follow the wizard for data type selection:
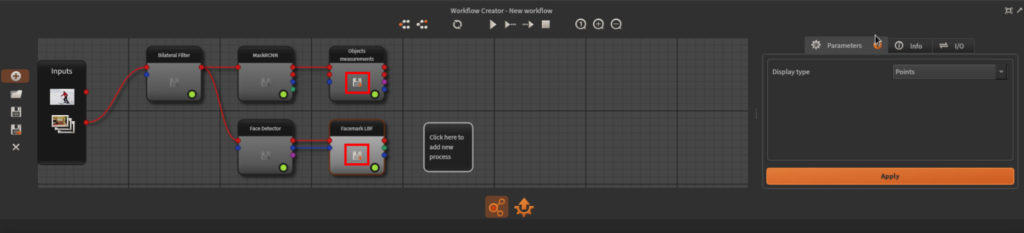
Finally, connect the global input to your root node. The global input data can be modified at any time by clicking the corresponding input button.
Note: A special icon appears in the workflow input area to notify the user that the input is a batch.
At this point, our workflow is ready to iterate over all the selected data. But what happens to each node's output? Are they lost each time the workflow is executed on a new image?
As soon as we connect a batch input to the root node, the Workflow Creator switches to Batch Processing mode. Consequently, a new button appears on each node, disabled by default.
This button gives you the possibility to enable automatic saving for all outputs of a specific node.
Once enabled, the STUDIO saves all output data to a predefined folder and loads them into the current project when the batch job is finished.
When dealing with batch processing, automatic saving of output data is mandatory. The engine behind the STUDIO implements a specific architecture to provide this feature. Each output type comes with its own save mechanism. In other words, each output type is responsible for defining:
This behavior can be extended to new data types, which is very interesting for Ikomia algorithms (out of scope here). Here is a list of compatible output types and their formats:
In addition, the STUDIO provides convenient file organization and naming conventions to facilitate further data analysis. By default, the root save folder is located at $HOME/Ikomia/Workflows/. You can change this default location in the global preferences of Ikomia.
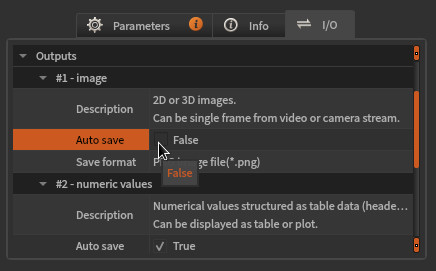
In the previous section, we described how to enable auto-save for a node. In that case, all outputs of this node will be saved at runtime. For those who want to customize this behavior, it is possible! Just follow these steps:
1. Select the node (mouse click)
2. Open the I/O tab in the information area of the Workflow Creator
3. Check or uncheck auto-save property for the desired output
That’s it!
You are now able to select batch input for your custom workflow and configure auto-save for your outputs. It's time to run it. The STUDIO will iterate over all elements (images, videos, or volumes) contained in the batch input, apply the chain of algorithms, and automatically save the selected outputs.
Note: The STUDIO does not launch Batch Processing through parallel jobs for optimization. However, each algorithm in the workflow may utilize multiprocessing techniques and GPU optimizations.


.svg)

