
How to Train YOLOv9 for Custom Object Detection
In this guide, we'll show the process of training a YOLOv9 model using a custom dataset. Specifically, we'll provide an example that focuses on training a vision model to recognize basketball players on a court. However, this guide is versatile, allowing you to apply it to any dataset of your choosing.
With the continuous evolution of computer vision technologies, YOLOv9 emerges as the latest advancement, developed by Chien-Yao Wang, I-Hau Yeh, and Hong-Yuan Mark Liao.
This trio of researchers has a rich history in the field, having contributed to the development of preceding models such as YOLOv4, YOLOR, and YOLOv7. YOLOv9 not only continues the legacy of its predecessors but also introduces significant innovations that set new benchmarks in object detection capabilities.
YOLOv9 is an advanced object detection model that represents a significant leap forward in computer vision technology. It is the latest iteration in the "You Only Look Once" (YOLO) series, known for its high speed and accuracy in detecting objects in images.
YOLOv9 stands out due to its incorporation of Programmable Gradient Information (PGI) and the introduction of the Generalized Efficient Layer Aggregation Network (GELAN), two groundbreaking innovations designed to enhance model performance and efficiency.
The YOLOv9 model is available in four variants, categorized based on their parameter count:
As of the latest update, the weights for the YOLOv9-S and YOLOv9-M models remain unpublished. The differentiation in model sizes caters to a range of application needs, from lightweight models for edge devices to more comprehensive models for high-performance computing environments.
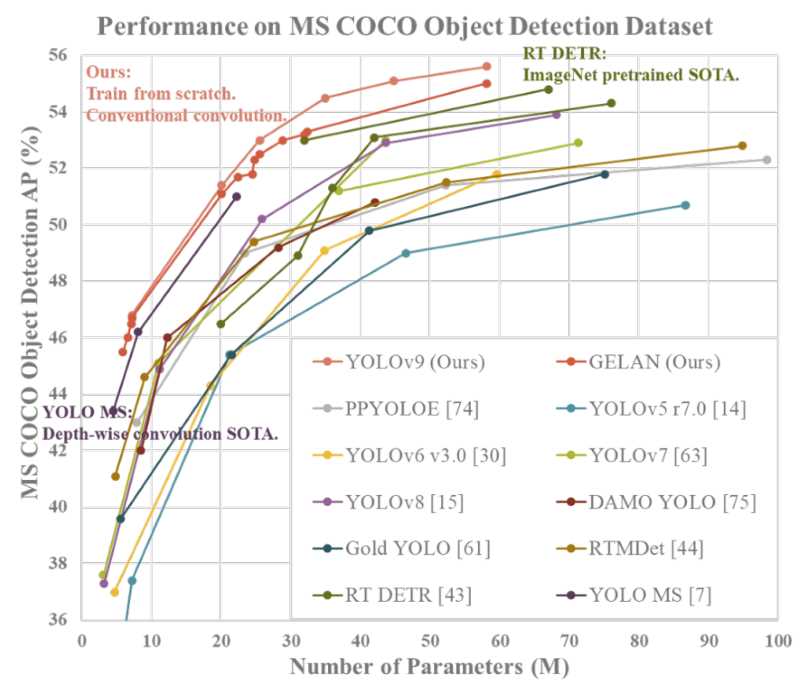
In terms of performance, YOLOv9 sets a new standard in the field of object detection. The smallest model configuration, despite its limited size, achieves an impressive 46.8% AP (Average Precision) on the MS COCO dataset's validation set. Meanwhile, the largest model variant, v9-E, boasts a remarkable 55.6% AP, establishing a new state-of-the-art benchmark for object detection performance.
This leap in accuracy demonstrates the effectiveness of YOLOv9's innovative optimization strategies.
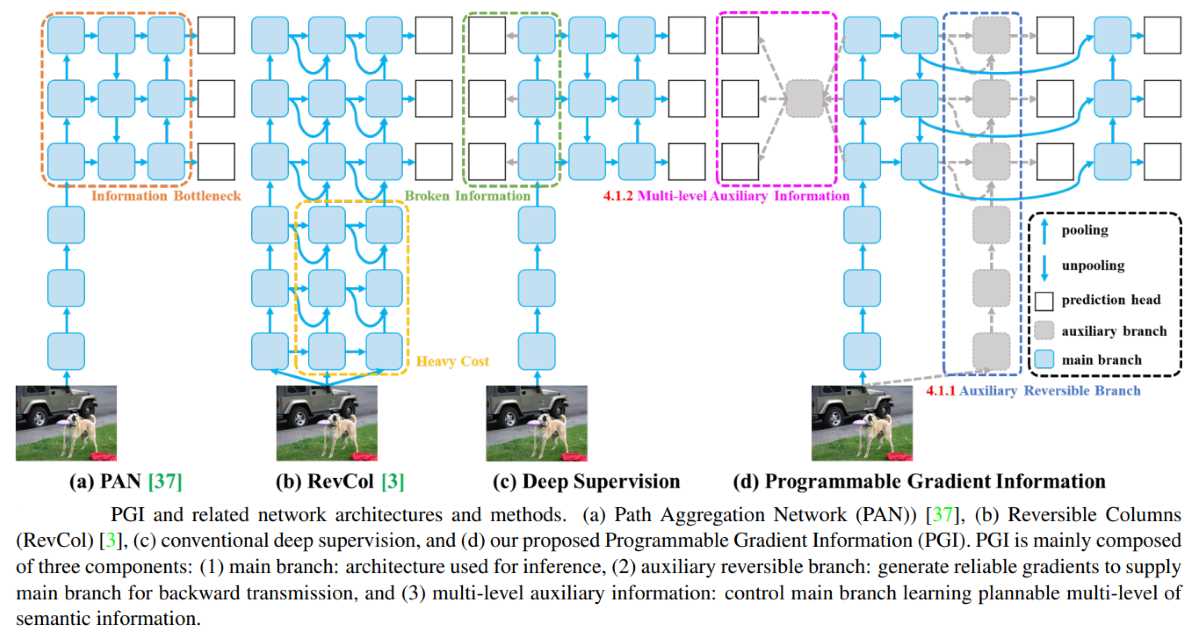
The YOLOv9 architecture introduces a significant advancement in the field of object detection by incorporating Programmable Gradient Information (PGI) and a new network architecture called Generalized Efficient Layer Aggregation Network (GELAN). Here's an explanation of these key components:
PGI is a novel concept aimed at addressing the challenge of data loss within deep neural networks. In traditional architectures, as information passes through multiple layers, some of it gets lost, leading to less efficient learning and model performance. PGI allows for more precise control over the gradients during the training process, ensuring that critical information is preserved and utilized more effectively. This leads to improved learning outcomes and model accuracy.
GELAN represents a significant innovation within the YOLOv9 architecture. It is designed to enhance the model's performance and efficiency by optimizing how different layers in the network aggregate and process information. The key focus of GELAN is to maximize parameter utilization, ensuring that the model can achieve higher accuracy without a proportional increase in computational resources or model size.
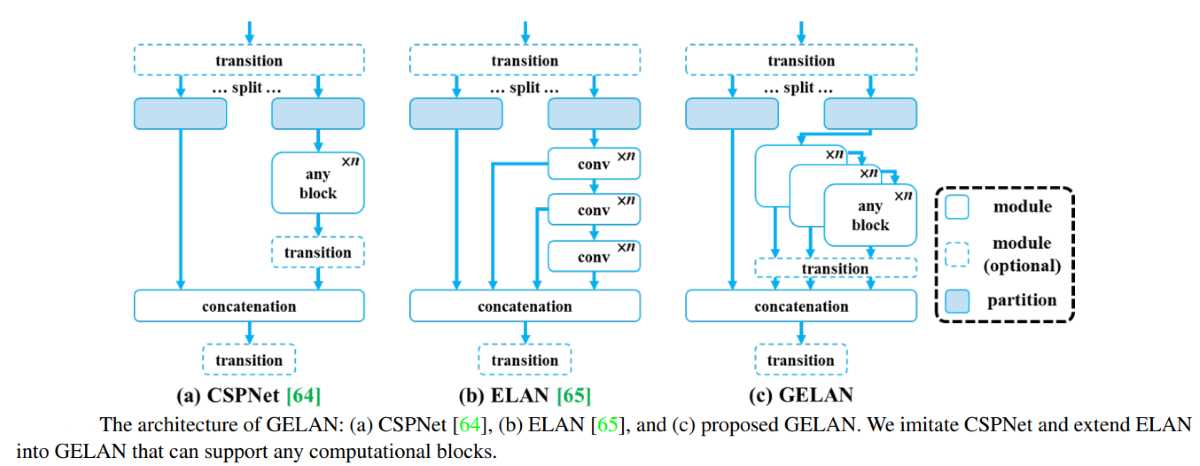
This architecture allows YOLOv9 to tackle object detection tasks with greater precision and efficiency, setting a new benchmark in the performance of deep learning models for computer vision.
The combination of PGI and GELAN in YOLOv9 represents a holistic approach to improving the learning capabilities of neural networks, focusing not just on the depth or width of the model, but also on how effectively it can learn and retain information throughout the training process.
This leads to a model that is not only highly accurate but also efficient in terms of computational resources, making it suitable for a wide range of applications from edge devices to cloud-based systems.
The Ikomia API allows to train and infer YOLOv9 object detector with minimal coding.
To begin, it's important to first install the API in a virtual environment [3]. This setup ensures a smooth and efficient start to using the API's capabilities.
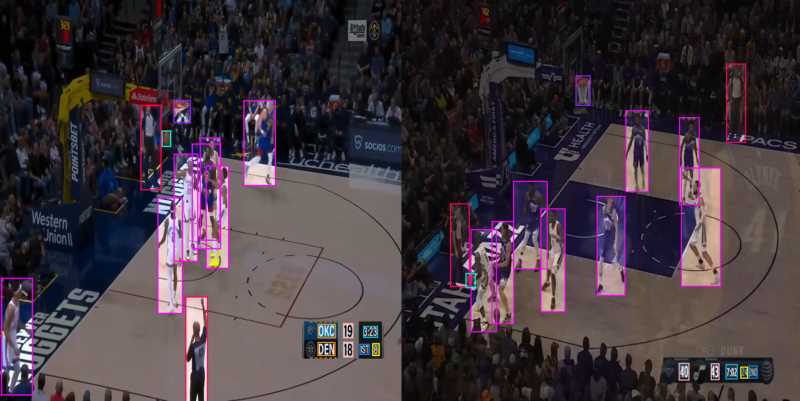
For this tutorial, we're using a Basketball dataset [4] from Roboflow with 539 images to illustrate the training of our custom YOLOv9 object detection model. The dataset contains nine labels:
These labels encompass both tangible objects on the basketball court and digitally overlaid information typically displayed on a TV screen, offering a comprehensive approach to object detection within the context of a basketball game.
You can also directly charge the notebook we have prepared.
Here are the configurable parameters :
- yolov9-s (coming soon)
- yolov9-m (coming soon)
- yolov9-c
- yolov9-e
The training process for 50 epochs was completed in approximately 50 mins using an NVIDIA L4 24GB GPU.
Once your model has completed its training phase, you can assess the performance by analyzing the graphs produced by the YOLOv9 training process. These visualizations represent various metrics that are crucial for understanding the effectiveness of your object detection model.
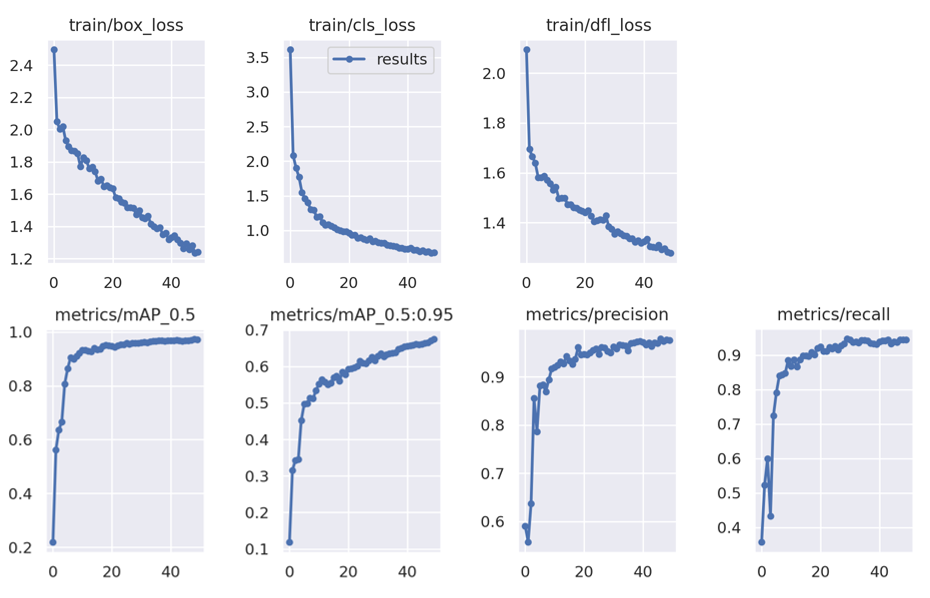

In summary, these plots suggest that the model has learned and improved its ability to detect and classify objects as training progressed. The high precision along with increasing recall and mAP values are indicative of a well-performing model. However, we can see that the model would have benefited from being trained for longer.
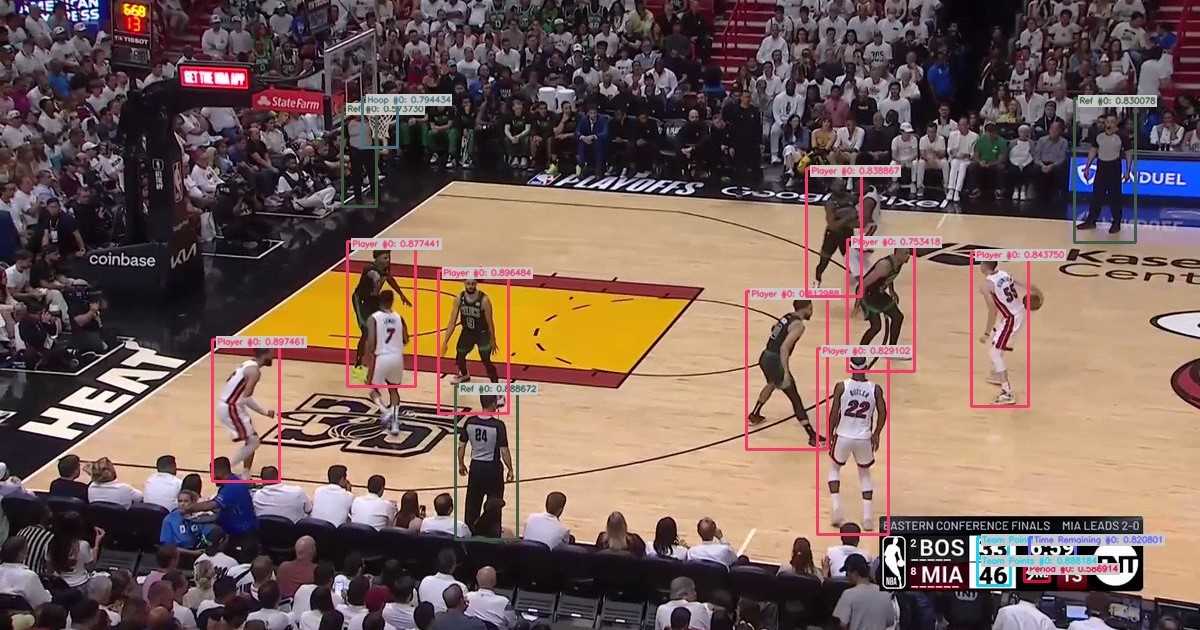
We can test our custom model using the ‘infer_yolo_v9’ algorithm. While by default the algorithm uses the COCO pre-trained Yolov9-c model, we can apply our fine-tuned model by specifying the 'model_weight_file' and 'class_file' parameters accordingly.
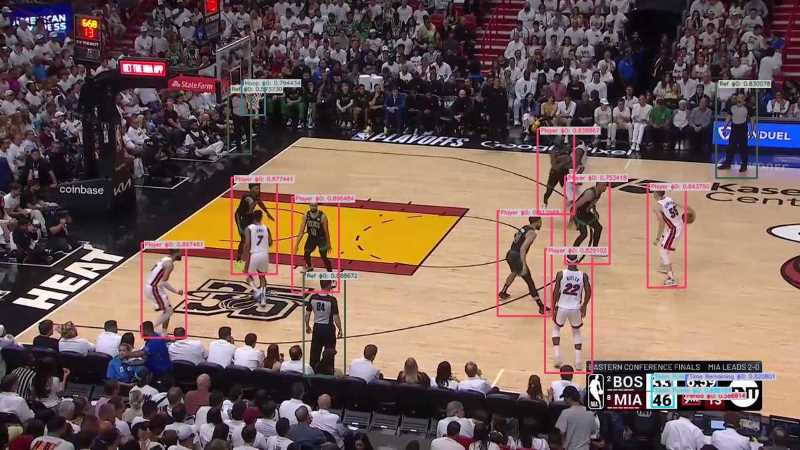
Our model successfully identified players, referees, and hoop, team point, period and time remaining.
[1] https://github.com/WongKinYiu/yolov9
[2] YOLOv9: Learning What You Want to Learn Using Programmable Gradient Information
[3] How to create a virtual environment in Python
[4] https://universe.roboflow.com/roboflow-universe-projects/basketball-players-fy4c2/dataset/12


.svg)


